| ARRIS Enterprises, Inc. Confidential Information | ||||||||||||||||||||||||||||||||||||
Network ServiceThe Network Service allows applications to control network configuration. A network can be accessed either by Ethernet or Wi-Fi depending on the STB's hardware capabilities. Because the current IP-STB models are designed to be clients, as opposed to gateways, Ethernet and wireless network connections cannot be used simultaneously. Currently, both static and dynamic IP addresses are supported for IPv4. Configuration parametersEach IP-STB is provisioned with customer-specific default settings in the factory. These settings are known as the configuration parameters. These parameters (see Default Network Settings) can be overridden temporarily and it is also possible to replace them permanently, which is described here. It is important to know about these parameters since several of them affect the behavior of the IP-STB with respect to networking. For assistance with changing the factory defaults and configuration parameters, please contact technical support. Wi-FiWi-Fi support consists of a 2x2 (transmit x receive) antenna configuration and one dual-band (2.4/5 GHz) radio. 802.11n is supported on both bands while 802.11ac is only specified and supported on the 5 GHz band. Other 802.11 standards are theoretically supported, but only 802.11n and 802.11ac are recommended for streaming video. Because the STB is fitted with only one radio, the IP-STB can only cover one frequency band at a time. Wi-Fi technical overviewA summary of the wireless networking capabilities is provided below:
Some notes about wireless networkingChoosing between the 2.4 GHz band and the 5 GHz band is not straight forward. While there is a lot more radio interference in the 2.4 GHz band, e.g., Bluetooth, microwave oven, etc., it can provide better range than a radio transmitting in the 5 GHz band because the 5 GHz signal suffers more attenuation when traversing through obstacles. So in dwellings with thick stone walls, for example, it might be more convenient to use the 2.4 GHz band than the 5 GHz band. Be patient when waiting for a connection. Wi-Fi, as a medium, is not as fast and reliable as Ethernet, and it can take a while for the link to come up. The 5 GHz band can introduce extra delays since the STB must guarantee no radio interference with certain professional systems, like radar.
Wireless Protected Setup (WPS) is supported by both the boot loader and KreaTV for
setting up the wireless network. Only the Push Button Configuration (PBC) method is supported. The
support is active by default; to disable the feature, the following line must be added to
the configuration parameters file:
Network configurationConfiguring the network connection is a rare event. When using the wired connection, the setup is normally automatic using DHCP, and when using the wireless, the standard case is that the end user performs the setup only once.
KreaTV offers two ways to configure the network: The boot loaderThe boot loader contains a Wi-Fi scanning tool, known as the Wi-Fi wizard, which allows end users to connect to a wireless network. The boot loader also includes a DHCP client that allows automatic connection to Ethernet networks without end user intervention. These features allow you, the operator, to quickly deploy solutions that can handle a variety of network scenarios without further integration work. TOI and the KreaTV platformIf you need more control over the configuration or when customization of the look and feel and functionality is desired, then an HTML/JavaScript portal running on the IP-STB can use In most cases, handling network configuration from the boot loader is sufficient, however, when more control or customization is needed, the TOI API must be used. Single active network interfaceEven on models that have two network interfaces available, only one can be active at any given time. This is a design decision based on the fact that the IP-STB is only intended to work as a client. IP settings, once applied, are system wide and affect both the boot loader and the KreaTV platform. We refer to the network accessible via these settings as the Boot Network. There is a difference in how the KreaTV platform and the boot loader choose which network interface to bring up. The boot loader always picks Ethernet when a link is detected. This is done to support repair and refurbishment operations at the factory. It will only use Wi-Fi when:
Default network settingsIP-STBs are provisioned in the factory with configuration parameters that bootstrap the system. These parameters can be overloaded with new values. When a factory reset from the boot loader is performed, the provisioned configuration parameters are restored. Here is a list of configuration parameters that affect the networking behavior, followed by an overview of those that are more relevant:
Dynamic IP addressingThe DHCP clients strive to be compliant with RFC 2131 and RFC 2132. Operators running fully managed networks can configure the IP-STB via DHCP options 43 and 60. Operators running OTT services can turn off this feature; see Booting for OTT operators for a description on how to do this. See DHCP options for more information about all the supported options. Static IP addressingThe following parameters are available when using static IP addressing:
Network configuration in the boot loader
Dynamic IP addressing is, by far, the most common method for setting up an IP network.
It is because of this that the IP settings menu in the boot loader is hidden. When static IP addressing
is used, the menu must be activated by adding the following line to the configuration parameters:
As stated above, the boot loader prioritizes Ethernet over wireless network connections. To configure a wireless network connection, the easiest way is to boot the IP-STB without the Ethernet cable inserted. That will trigger the Wi-Fi wizard. Disabling the Wi-Fi Wizard
The Wi-Fi configuration wizard provided by the boot loader should be
sufficient for most situations. However, you may want to have a
customized first-time setup application and override the wizard.
To prevent the boot loader from launching the
Wi-Fi wizard, the following line must be added to the configuration parameters:
Special considerationsBooting without a network connection
In some cases, it is desirable to force the boot loader and KreaTV to keep on booting,
even if no network can be set up. This can be done by adding the following line to the
configuration parameters:
Typically, this parameter is added when a customized first-time installation screen or wizard is required. To handle the situation where neither the boot loader nor KreaTV has been able to set up a network, a local portal that can handle networking must be present in the boot image. If no boot image is stored in the IP-STB, the IP-STB will reboot. Booting for OTT operators
To prevent the IP-STB from requesting Vendor Specific Information, the following parameter
can be added to the configuration parameters:
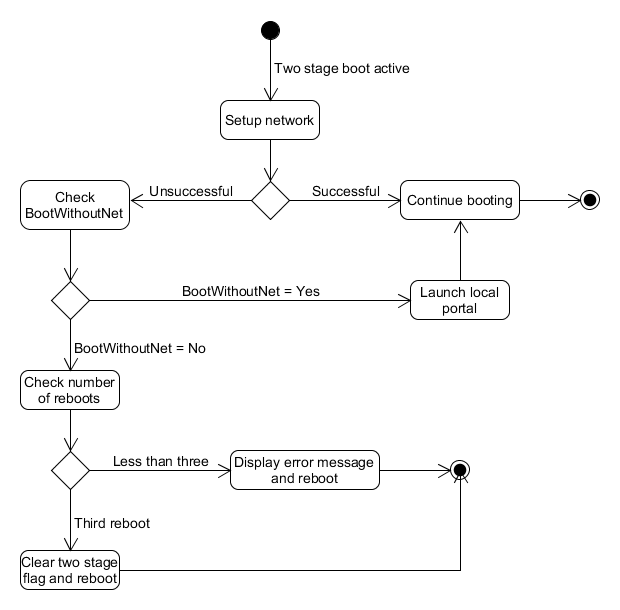
Factory resetTo restore the network settings to their original values, the portal developer must include the flag REMOVE_PERSISTENT_INFORMATION_OBJECTS when performing a factory reset. Settings are also restored when doing a full factory reset. Two-stage boot (formerly known as fast boot)Two-stage boot requires special handling by KreaTV if the boot loader is the entry point for network configuration. In case there is no network connectivity, KreaTV will reboot and try again. This cycle is repeated three times and, if unsuccessful, the two-stage boot flag will be cleared, meaning that the second stage boot loader will be activated on the third reboot, giving the end-user a chance to reconfigure the network. In case the STB is configured to boot without a network (see Booting without a network connection), then the local portal is launched.
Handling two-stage boot when no network is available. Handling Passive StandbyWhen entering passive standby, the IP-STB will tear down the network but will retain the IP address lease if DHCP is used. When the IP-STB wakes up again, it will try to renew its lease, provided that it has not expired yet. If the network cannot be set up within the DHCP client's timeout (60s), then the IP-STB will be rebooted unless it is configured to boot without a network, in which case it is up to the portal application to resolve the situation. Network CapabilitiesNetwork Capabilities determine what kind of functionality is available and what settings the network will take. For example, if the network has Wi-Fi capabilities it will accept wireless network settings and allow the user to perform wireless-network-related operations, such as scans, on that network. See this page for a complete set of capabilities. Network StateA network can be in any of four states (ToiNetwork.ToiState):
Portal applications should never assume anything about the condition of the network. On startup, especially when booting without an enabled network, the application should check for network availability. To properly monitor the network during normal operation and to be able to handle passive standby, the portal application must register listeners. See below for examples on how to implement these checks. TOI API Overview
The service is accessed via the
The entry point to a network is the
<sdk_root>/examples/example-html-portal/modules/wifi/setup.js
TOI usage examplesThis section illustrates a couple of common use cases using TOI together with the boot network. The full code for these examples can be found in the SDK. Checking if the network is readyA network is ready when it has link and at least one IP address configured. This information is available in the network information. <sdk_root>/examples/example-html-portal/modules/settings/settings.js
It is possible to be notified when the state changes by listening for the
<sdk_root>/examples/example-html-portal/modules/settings/settings.js
Scanning wireless networks
Use the <sdk_root>/examples/example-html-portal/modules/wifi/setup.js
Connecting to wireless network
Use the <sdk_root>/examples/example-html-portal/modules/wifi/setup.js
See
TOI Network Service Interface
|