Front Panel Service Configuration
During startup, the Front Panel
Service reads /etc/frontpanel_config.xml to
determine how the STB's front panel should behave based on
Information Object values and service-specific variables. For
example, which LED shall be lit during standby and in which color.
Since KreaTV 5.0, the LEDs can only be controlled through this XML file.
KreaTV ships with a default configuration that can be overridden by adding
kreatv-option-frontpanel-config:config=<custom config file.xml>
to the boot image configuration file. The configuration XML file should
conform to the DTD at the end of this page.
The Expression and Results elements
The <Expression> and <Result>
elements in the configuration file allow flexible control of LEDs
and segment display status.
The <Expression> element accepts a
comma-separated list of variables to track. These variables can be
generic Information Objects or variables that are specific for the
Front Panel service.
-
$object is an Information Object named "object". The
string shall only contain alphanumeric characters, dots, and
underscores.
-
#variable is an internal Front Panel Service
variable, and it can be one of the following:
Front Panel Service specific variables
| Variable name |
Comment |
Values |
| PowerProfile |
The power state of the STB. See
Power Management for more information. |
- active
- active_standby
- passive
|
| WiFiState |
The state of the WiFi connection. |
- connected
- connecting
- inactive
|
<Result> elements are nested
inside <Expression> elements. They also accept a
comma-separated list of values that are matched against those
defined in the parent <Expression>. When the
state variables defined in the <Expression> match
the values specified in a <Result>, the state
defined inside the <Result> tag becomes
active.
Two wildcards are supported. The * character
in <Result> value strings matches any
substring. The paneltype attribute supports,
additionally, the ? wildcard, which matches a single
arbitrary character.
When several <Result> elements are specified for
an expression, the first match in the order of
the <Result> elements will be the one used. If,
for instance, "*" is given as the first
<Result> then no
other <Result> elements will be considered.
A small configuration example
Here is an example of a front panel configuration file showing
how to configure the LED to display WiFi connection status. The LED
will have steady green light if WiFi is not connected, pulsate in blue
light when connecting to WiFi, and a steady blue light when connected.
<?xml version="1.0"?>
<FrontPanelConfig version="2.1">
  <Panel type="*">
    <Expression value="#WiFiState">
      <Result value="connected">
        <RgbLed id="1" color1="#000040" color2="#000040"
                transitiontime="1000" holdtime="1000"/>
      </Result>
      <Result value="connecting">
        <RgbLed id="1" color1="#000080" color2="#000000"
                transitiontime="400" holdtime="0"/>
      </Result>
    </Expression>
    <Result value="*">
      <RgbLed id="1" color1="#005000" color2="#005000"
	      transitiontime="1000" holdtime="1000"/>
    </Result>
  </Panel>
</FrontPanelConfig>
The RgbLed and RgbColorAlias elements
The <RgbLed> element makes it possible to specify
an animation between two RGB colors. An example of the kind of
animation that is possible to achieve is depicted below:
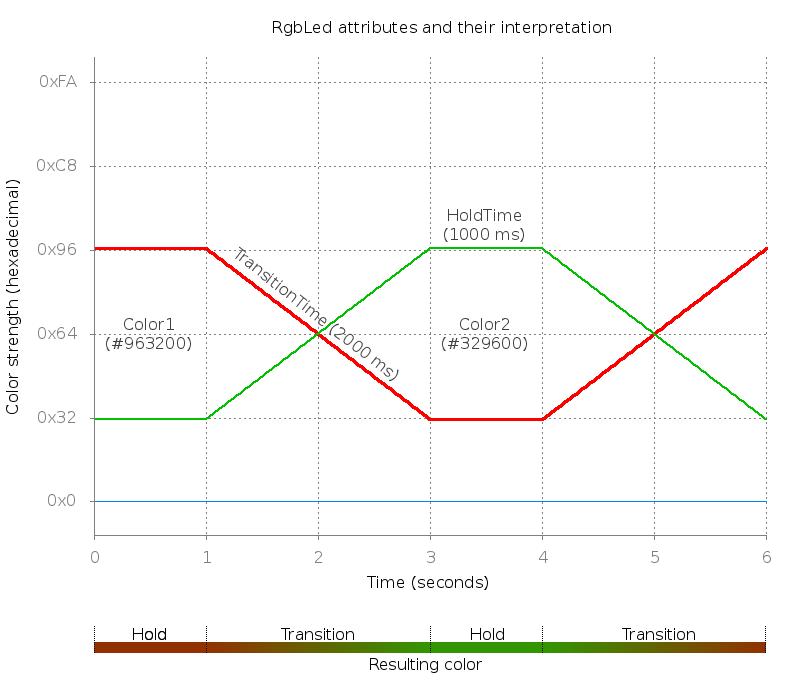
The available attributes for the <RgbLed> element
are as follows:
<RgbLed> element attributes
| Attribute name |
Description |
| color1 |
An RGB triplet or RGB color alias name of the first active color. |
| color2 |
An RGB triplet or RGB color alias name of the second active color. If
this color is specified to be the same as color1, the color will be kept
static. |
| holdtime |
Specifies how long, in milliseconds, the current active color should
stay stable before transitioning to the next color. |
| transitiontime |
Specifies how long, in milliseconds, the transition from the active
color to the next color should take. |
It is common that different set-top box models will produce
different color nuances given the same RGB triplet. As an example,
the RGB triplet used to produce a certain nuance of e.g. orange for
set-top box model A might not be the same RGB triplet used to
produce the very same nuance of orange on set-top box model B.
You can use the <RgbColorAlias> element to
overcome this problem. This tag allows you to give a name to a
specific RGB triplet and use that name when defining the front panel
behavior. The tag accepts a paneltype attribute that
makes it possible to define different RGB colors for different STB
models, but all of them using the same color name.
<RgbColorAlias name="Red-Faint" color="#110000" paneltype="vip43?2"/>
<RgbColorAlias name="Red-Faint" color="#1F0000" paneltype="vip4344"/>
The example above defines two slightly different RGB triplets for
the color Red-Faint. By referring to this color by name
in the rest of the configuration, you can compensate for the
different color tints produced by the different STB models.
Front panels with RGB LEDs provide RCU input feedback by producing a
pulse in color intensity. Color hue is kept, but light intensity is
increased momentarily and gradually faded back to its original
state. The concept is illustrated in the image below:
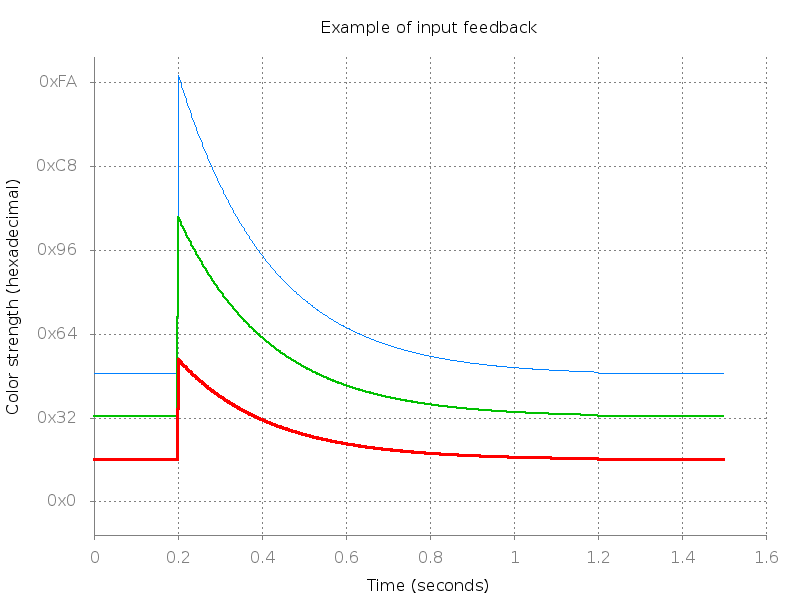
When customizing RGB LED colors, it is recommended to use medium
intensities to leave some headroom for RCU feedback to be
noticeable.
RGB LED colors available during passive standby may be limited by
hardware capabilities.
Example using the RgbLed and RgbColorAlias elements
Here is an example of a front panel configuration file showing
usage of <RgbLed>
and <RgbColorAlias> elements:
<?xml version="1.0"?>
<FrontPanelConfig version="2.1">
<RgbColorAlias paneltype="vip4302" name="red-low" color="#200000" />
<RgbColorAlias paneltype="vip4302" name="red-medium" color="#300000" />
<RgbColorAlias paneltype="vip4302" name="red-high" color="#FF0000" />
<RgbColorAlias paneltype="vip4302" name="green-low" color="#002000" />
<RgbColorAlias paneltype="vip4302" name="green-medium" color="#003000" />
<RgbColorAlias paneltype="vip4302" name="blue-low" color="#000020" />
<RgbColorAlias paneltype="vip4302" name="blue-medium" color="#000030" />
<RgbColorAlias paneltype="vip43XX" name="red-low" color="#120000" />
<RgbColorAlias paneltype="vip43XX" name="red-medium" color="#200000" />
<RgbColorAlias paneltype="vip43XX" name="red-high" color="#FF0000" />
<RgbColorAlias paneltype="vip43XX" name="green-low" color="#001200" />
<RgbColorAlias paneltype="vip43XX" name="green-medium" color="#002000" />
<RgbColorAlias paneltype="vip43XX" name="blue-low" color="#000012" />
<RgbColorAlias paneltype="vip43XX" name="blue-medium" color="#000020" />
<Panel type="vip43??">
<Expression value="#PowerProfile,#WiFiState">
<Result value="active,connected">
<RgbLed id="1" color1="blue-low" color2="blue-medium"
transitiontime="1000" holdtime="2000" />
</Result>
<Result value="active,connecting">
<RgbLed id="1" color1="#000000" color2="blue-medium"
transitiontime="400" holdtime="0" />
</Result>
<Result value="active,*">
<RgbLed id="1" color1="green-low" color2="green-medium"
transitiontime="1000" holdtime="2000" />
</Result>
<Result value="active_standby,*">
<RgbLed id="1" color1="red-low" color2="red-medium"
transitiontime="1000" holdtime="2000" />
</Result>
<Result value="*">
<RgbLed id="1" color1="red-high" color2="red-high"
transitiontime="1000" holdtime="2000" />
</Result>
</Expression>
</Panel>
</FrontPanelConfig>
This configuration will cause the Front Panel Service to act as follows:
-
If the power profile is active and WiFi is connected,
RGB LED 1 will start transitioning between the two colors "blue-low"
and "blue-medium", where each color will be stable for 2000 ms before
transitioning over to the next color, with the transition taking 1000
ms.
-
If the power profile is active and WiFi is connecting (i.e., the
WiFi module is trying to establish or re-establish its connection), RGB
LED 1 will start transitioning between the two colors "#000000" (no
light) and "blue-medium", where each color will be stable for 0 ms
before transitioning over to the next color, with the transition taking
400 ms. This color transition should be quite noticeable for an end-user.
-
If the power profile is active and the WiFi is in any other state
(e.g. inactive), RGB LED 1 will start transitioning between the two
colors "green-low" and "green-medium", where each color will be stable for
2000 ms before transitioning over to the next color, with the transition
taking 1000 ms.
-
If the power profile switches to active_standby, RGB LED 1 will start
transitioning between the two colors "red-low" and "red-medium", where
each color will be stable for 2000 ms before transitioning over to the
next color, with the transition taking 1000 ms.
-
If the power profile switches to any other standby mode, RGB LED 1 will
be configured to emit the static color "red-high".
The Led and SegmentDisplay elements
The <Led> element is used to specify the behavior
of LEDs that have predefined colors.
The attributes available for the <Led> element
are as follows:
<Led> element attributes
| Attribute name |
Description |
| color |
The color of the LED. See
the DTD below for valid
colors. |
| blinkfrequency |
The blink frequency in Hz. This attribute is optional. |
| irblinkcolor |
The color which the LED should blink with when IR input is
received. This attribute is optional. |
The <SegmentDisplay> element makes is possible to
specify a text on a segment display. It has two modes: a text mode
where arbitrary text can be shown and a clock mode where the time of
day is shown.
The available attributes for the <SegmentDisplay>
element are as follows:
<SegmentDisplay> element
attributes
| Attribute name |
Description |
| mode |
Choose text for showing text and clock for showing a clock. |
| text |
The text to be shown. This attribute is only valid if mode is test to text. |
| colonstate |
Set to true to show a colon on LED segment display. This attribute is optional. |
| intensity |
The intensity of SegmentDisplay in percentage of max intensity. |
Example using Led and SegmentDisplay elements
Consider the following example of front panel configuration file
showing the usage of the <Led>
and <SegmentDisplay> elements:
<?xml version="1.0"?>
<FrontPanelConfig version="2.1">
  <Panel type="vip19??">
    <Expression value="#PowerProfile">
      <Result value="active">
        <Led label="POWER" color="off"/>
        <Led label="POWER1" color="green" blinkfrequency="0.0"/>
        <SegmentDisplay mode="text" colonstate="false" text="KTV"
			intensity="100"/>
      </Result>
      <Result value="*">
        <Led label="POWER" color="red" blinkfrequency="0.5"/>
        <Led label="POWER1" color="off" />
        <SegmentDisplay mode="clock" colonstate="true" intensity="20"/>
      </Result>
    </Expression>
    <Expression value="$cfg.dlna.dms.enabled,$var.time.valid">
      <Result value="TRUE,TRUE">
        <Led label="GENERIC" color="green"/>
      </Result>
      <Result value="FALSE,*">
        <Led label="GENERIC" color="off"/>
      </Result>
      <Result value="*">
        <Led label="GENERIC" color="red"/>
      </Result>
    </Expression>
  </Panel>
</FrontPanelConfig>
This configuration will cause the Front Panel Service to act as follows:
- At startup, the Front Panel Service will subscribe to the
cfg.dlna.dms.enabled
and var.time.valid
information objects.
- If the current power profile is any standby mode,
power LED 1 will blink with a red light at 0.5 Hz and power LED 2 will be
unlit. The segment display will show a clock and the intensity
of the display will be at 20% of the maximum brightness.
- When the power profile switches to active, power LED 1 will be unlit and
power LED 2 will be lit with a solid green light. The segment
display will be in text mode displaying the text "KTV".
- If the
cfg.dlna.dms.enabled object is set to TRUE
and var.time.valid is set to TRUE, the generic LED
will be set to green. If cfg.dlna.dms.enabled is set to
FALSE, the LED will be turned off. The LED will be
set to red if the objects are set to something else.
DTD specification for front panel configuration files
The DTD below describes the structure of the front panel configuration.
The current version of FrontPanelConfig is "2.1". XML
files written since version "2.0" will still be parsed,
but it is recommended to update the configuration files to comply
with the format described here.
<!ELEMENT FrontPanelConfig (Panel*)>
<!ATTLIST FrontPanelConfig
	  version CDATA #REQUIRED>
<!ELEMENT Panel (Expression*, RgbColorAlias*)>
<!ATTLIST Panel
          type CDATA #REQUIRED>
<!ELEMENT Expression (Result+)>
<!ATTLIST Expression
	  value CDATA #REQUIRED>
<!ELEMENT Result (Led*, SegmentDisplay?, RgbLed?)>
<!ATTLIST Result
          value CDATA #REQUIRED>
<!ELEMENT Led EMPTY>
<!ATTLIST Led
          id CDATA #IMPLIED
          label CDATA #IMPLIED
          color (off | red | green | orange | blue | yellow | cyan | magenta | white) #REQUIRED
          blinkfrequency CDATA #IMPLIED
          irblinkcolor (off | red | green | orange | blue | yellow | cyan | magenta | white) #IMPLIED>
<!ELEMENT SegmentDisplay EMPTY>
<!ATTLIST SegmentDisplay
          mode (text | clock) #REQUIRED
          text CDATA #IMPLIED
          colonstate (false | true) #IMPLIED
          intensity CDATA #IMPLIED>
<!ELEMENT RgbLed EMPTY>
<!ATTLIST RgbLed
          id CDATA #IMPLIED
          label CDATA #IMPLIED
          color1 CDATA "000000" #REQUIRED
          color2 CDATA "000000" #REQUIRED
          holdtime CDATA #REQUIRED
          transitiontime CDATA #REQUIRED>
<!ELEMENT RgbColorAlias EMPTY>
<!ATTLIST RgbColorAlias
          paneltype CDATA #REQUIRED
          name CDATA #REQUIRED
          color CDATA "000000" #REQUIRED>