| ARRIS Enterprises, Inc. Confidential Information |
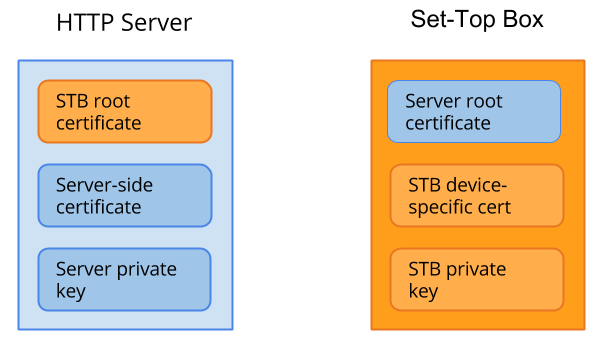
Mutual AuthenticationIntroductionWhen an HTTPS connection is established, usually only the server is authenticated by the client. This is known as one-way authentication. The server will send a certificate chain, and the client will authenticate the signatures starting from the root of the chain. Normally, the browser on the STB (the client) has several root certificates issued from several certificate authorities (CAs), and it searches for one that matches the CA used to sign the root of the server's certificate chain. It is also possible to have a mutual, or two-way authentication where the server authenticates the client as well. Both types of authentication are handled automatically by the browser once configured. To implement the most reliable authentication, the server should be using a certificate signed by a CA with limited exposure, e.g. ARRIS, while requiring the STB to use a device-specific certificate. This setup will almost guarantee that both sides are whom they claim to be. The next best solution is to use a regular HTTPS connection using any certificate issued by a well-known CA. But since such a CA may have signed certificates they should not have, you may want to consider an extra level of authentication at the application level (see the section on signing and verifying). As a lightweight type of authentication, it is also possible to just sign data and send it over HTTP. This is considered insecure because it is susceptible to reply attacks; servers do not have any mechanism to verify that the data is actually coming from your Set-Top Box. Keys and CertificatesTo perform mutual authentication, both the server and STB will need a certificate to show who they are. In addition, they will also need each others root certificates (a certificate signed by the others private key) in order to authenticate that certificate.
The following certificates and keys are used:
Authentication ProcessThe authentication process begins with the client contacting the server with a Next, the server sends a This authentication process is completely automatic between browser and server, and does not require any manual effort beyond the initial configuration of the server and STB boot image. ConfigurationIn order for the STB to authenticate the server, a copy of the server root certificate needs to be available in the STB boot image. You do this by adding the following to the boot image configuration file: In addition, the server needs a copy of the STB's root certificate. This is located at Using a custom STB certificate and keyThe STB contains an ARRIS device-specific certificate and an STB private key, installed during the factory production, but it is possible to add and use custom ones, too. Please consult the Ekioh browser documentation if you need any more details about this option and the requirements of the certificates and private keys. You would add the following to the boot image configuration file: Additional signing and verifying of application dataEven though the server and STB have now authenticated each other in the above case, it is sometimes required to pass important data between the STB and the server in a tamper-proof way. To achieve this, KreaTV offers a signing and verifying service. Signing dataTo sign data from within an application on the STB, you can use It is also possible to provide a custom key to use when signing, please see the documentation for kreatv-option-authentication for more details. Verifying dataTo verify signed data sent by the server, the STB application can use SignaturesEvery now and then it is useful or even required to add some kind of assurance that transmitted data hasn’t been tampered with in transit, and that it was sent from a specific entity, e.g. a specific web server or a specific STB. This is achieved by creating a signature for the data that we want to secure. Signatures are based on public key cryptography and KreaTV supports RSA. A signature is created by creating a one-way hash for the data to be signed and then encrypt this hash value using the private key of the RSA key pair. On the set-top boxSigning data is straightforward for the portal developer. It is performed by calling
The resulting signature is a base64 encoded string to simplify inclusion in HTTP requests as illustrated below: Verifying signatures is also straightforward. It is performed by calling
It is up to you, the portal developer, to choose the correct key. There is no mechanism offered by KreaTV to do this. On the web serverThe inner workings of the signatures shouldn’t matter to the portal maker but it is of importance to a server/back end developer. KreaTV-constructed signatures follow the blue print given below. Note carefully that KreaTV also expects that the signatures it evaluates follow the same blue print:
To verify a signature two items are needed, the RSA public key counterpart to the RSA private key used to encrypt the hash value, and the data for which the signature was created. The steps for verifying a signature are as follows:
|