Front Panel Service Configuration
At startup, the Front Panel Service
will look for an XML file in /etc/frontpanel_config.xml containing
the configuration on how the front panel automatically, without any application
interaction, should react on changes in information objects and/or Front Panel
Service specific variables, e.g. which LED shall be lit in which color in standby.
Since KreaTV 5.0, the LEDs can only be controlled through the XML file.
The default configuration XML file can be overridden by adding
kreatv-option-frontpanel-config:config=<custom config file.xml>
to the boot image config file. The configuration XML file should
conform to the DTD below, which describes the structure of the front panel
configuration.
<!ELEMENT FrontPanelConfig (Panel*)>
<!ATTLIST FrontPanelConfig
	  version CDATA #REQUIRED>
<!ELEMENT Panel (Expression*, RgbColorAlias*)>
<!ATTLIST Panel
          type CDATA #REQUIRED>
<!ELEMENT Expression (Result+)>
<!ATTLIST Expression
	  value CDATA #REQUIRED>
<!ELEMENT Result (Led*, SegmentDisplay?, RgbLed?)>
<!ATTLIST Result
          value CDATA #REQUIRED>
<!ELEMENT Led EMPTY>
<!ATTLIST Led
          id CDATA #IMPLIED
          label CDATA #IMPLIED
          color (off | red | green | orange | blue | yellow | cyan | magenta | white) #REQUIRED
          blinkfrequency CDATA #IMPLIED
          irblinkcolor (off | red | green | orange | blue | yellow | cyan | magenta | white) #IMPLIED>
<!ELEMENT SegmentDisplay EMPTY>
<!ATTLIST SegmentDisplay
          mode (text | clock) #REQUIRED
          text CDATA #IMPLIED
          colonstate (false | true) #IMPLIED
          intensity CDATA #IMPLIED>
<!ELEMENT RgbLed EMPTY>
<!ATTLIST RgbLed
          id CDATA #IMPLIED
          label CDATA #IMPLIED
          color1 CDATA "000000" #REQUIRED
          color2 CDATA "000000" #REQUIRED
          holdtime CDATA #REQUIRED
          transitiontime CDATA #REQUIRED>
<!ELEMENT RgbColorAlias EMPTY>
<!ATTLIST RgbColorAlias
          paneltype CDATA #REQUIRED
          name CDATA #REQUIRED
          color CDATA "000000" #REQUIRED>
The current version of FrontPanelConfig is "2.1". XML files
written since version "2.0" will still be parsed, but it is
recommended to write new configuration files in the format described here.
In order to allow for flexible control of when LEDs and segment display
should change state the Expression and Result elements are used.
The Expression element has a string attribute that consists of
variables which are set from information objects and/or Front Panel
Service specific variables. When a child Result element matches its
expression parent element the child elements Led, RgbLed and SegmentDisplay
will define the new LED and segment display states.
Variables in the Expression value attribute are defined in the following way:
$object is an Information Service object named
"object". The string shall only contain alphanumeric characters and
the dot and underscore characters.
#variable is one of the below listed Front Panel
Service specific variables.
Front Panel Service specific variables
| Variable name |
Comment |
Values |
| PowerProfile |
The power state of the STB. See
Power Management for more information. |
- active
- active_standby
- passive
|
| WiFiState |
The state of the WiFi connection. |
- connected
- connecting
- inactive
|
To allow for easier matches between expression and result strings the '*'
character can be used in the result strings to match any substring in the
expression. The extreme would be to have "*" as the full Result string
which would match any value in the expression. The '*' character is also
allowed in the Panel type string but for this attribute the '?' is also
allowed to match any single character, e.g. "vip19?3" will match both
vip1963 and vip1903.
When several Result elements are specified for an expression the first
match in the order of the Result elements will be the one used. If for
instance "*" is given as the first Result then no other Result elements
will be considered.
The RgbLed and RgbColorAlias elements
The RgbLed element makes it possible to specify an animation between two RGB
triplets. An example of the kind of animation that is possible to achieve is
depicted below:
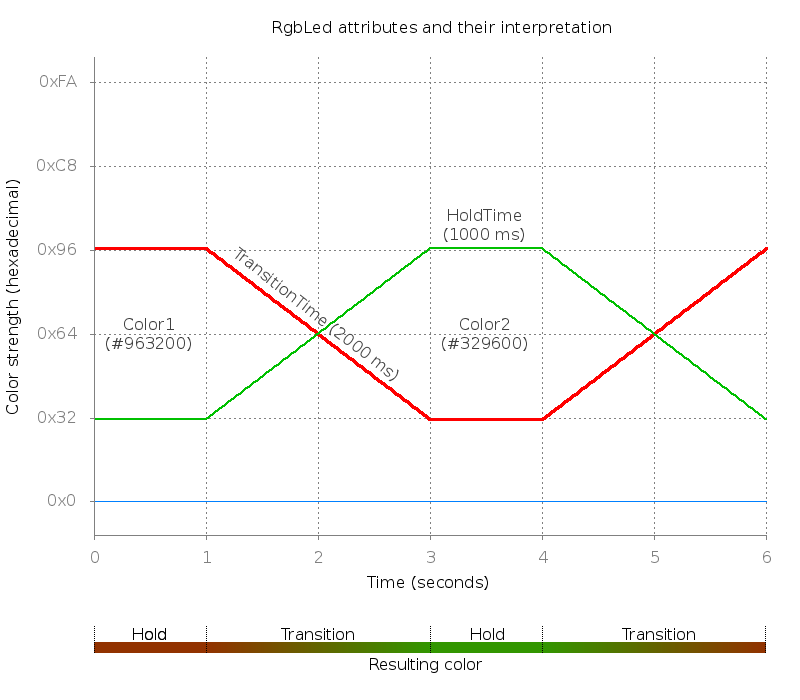
The available attributes for the RgbLed element are as follows:
RgbLed element attributes
| Attribute name |
Description |
| color1 |
An RGB triplet or RGB color alias name of the first active color. |
| color2 |
An RGB triplet or RGB color alias name of the second active color. If
this color is specified to be the same as color1, the color will be kept
static. |
| holdtime |
Specifies how long (in milliseconds) the current active color should
stay stable before transitioning to the next color. |
| transitiontime |
Specifies how long (in milliseconds) the transition from the active
color to the next color should take. |
The available value of the RgbLed element for each STB model are as follows:
The available colors of the RgbLed element
|
Led Count |
Label |
Supported Color |
| VIP3500 |
1 |
RGB |
red,green,blue |
| VIP430x |
1 |
RGB |
red,green,blue |
| VIP56x2 |
1 |
RGB |
red,green,blue |
It is common that different set-top box models will produce different color
nuances given the same RGB triplet. As an example, the RGB triplet used to
produce a certain nuance of e.g. orange for set-top box model A might not be
the same RGB triplet used to produce the very same nuance of orange on
set-top box model B. To aid in this matter, there exists an element called
RgbColorAlias. This element makes it possible to alias a certain RGB triplet
with a textual name. An RgbColorAlias element must also specify which panel
type it is valid for.
Here is a practical (fictitious) example of how the RgbColorAlias element can
be used: The name "Red-Faint" could be specified as an alias for the RGB
triplet #110000 for VIP4302 set-top box models. This particular example is
expressed in XML as: <RgbColorAlias name="Red-Faint" color="#110000"
paneltype="vip43?2" />. If another box model, e.g. VIP43xx achieves
the same nuance but with a different triplet, #1F0000, another
RgbColorAlias element can be added: <RgbColorAlias
name="Red-Faint" color="#1F0000" paneltype="vip43XX" />. This comes
in handy when having the same rule set-up for different set-top box models
that are showing colors in slightly different ways.
IR/Input feedback for an RGB LED works by amplifying the current active
color. E.g., if the current color is #110000, it will be amplified to
#FF0000 when receiving input, and then gradually fade back to the original
color. If more than one color is active at the time of receiving input, both
of these colors will be amplified with their current ratio intact. E.g., if
the LED shows the color #332211, the color will be amplified to #FFAA55 on
input, and then gradually return to the original color. The concept is
illustrated in the image below:
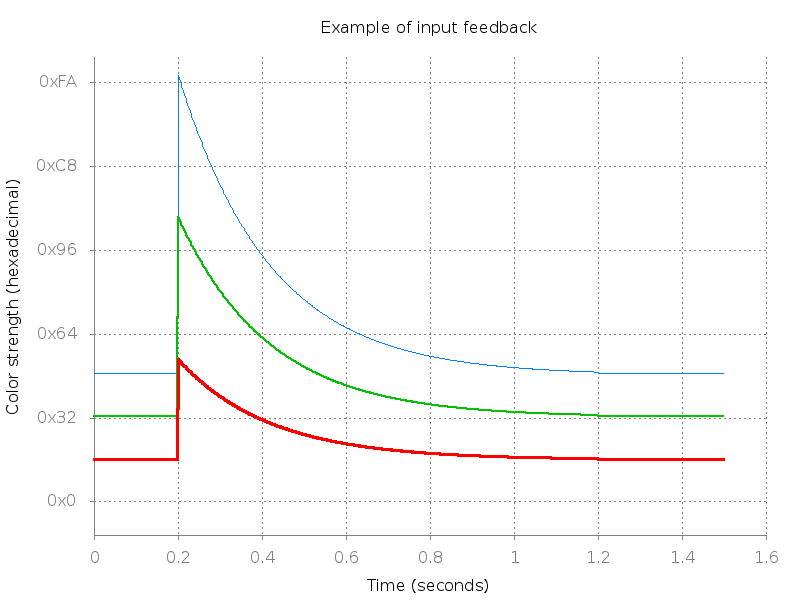
When setting up the configuration for an RGB LED, it is important to not set
too high color intensities. Otherwise, there is no intensity left to
indicate input feedback.
It might not be possible to configure certain colors for an RGB LED when
entering passive standby. This has to do with power limitations of the
hardware used to generate the electrical signals that controls the LED.
Example using Led and SegmentDisplay tags
Consider the following example of front panel configuration file showing
usage of the Led and SegmentDisplay tags:
<?xml version="1.0"?>
<FrontPanelConfig version="2.1">
  <Panel type="vip19??">
    <Expression value="#PowerProfile">
      <Result value="active">
        <Led label="POWER" color="off"/>
        <Led label="POWER1" color="green" blinkfrequency="0.0"/>
        <SegmentDisplay mode="text" colonstate="false" text="KTV"
			intensity="100"/>
      </Result>
      <Result value="*">
        <Led label="POWER" color="red" blinkfrequency="0.5"/>
        <Led label="POWER1" color="off" />
        <SegmentDisplay mode="clock" colonstate="true" intensity="20"/>
      </Result>
    </Expression>
    <Expression value="$cfg.dlna.dms.enabled,$var.time.valid">
      <Result value="TRUE,TRUE">
        <Led label="GENERIC" color="green"/>
      </Result>
      <Result value="FALSE,*">
        <Led label="GENERIC" color="off"/>
      </Result>
      <Result value="*">
        <Led label="GENERIC" color="red"/>
      </Result>
    </Expression>
  </Panel>
</FrontPanelConfig>
This configuration will cause the Front Panel Service to act as follows:
- At startup, the Front Panel Service will subscribe to the
cfg.dlna.dms.enabled and var.time.valid
information objects.
- If the current power profile is any standby mode,
power LED 1 will blink with a red light at 0.5 Hz and power LED 2 will be
unlit. The segment display will show a clock and the intensity
of the display will be at 20% of max.
- If the power profile switches to active, power LED 1 will be unlit and
power LED 2 will be lit with a solid green light. The segment
display will be in text mode displaying the text KTV.
- If the
cfg.dlna.dms.enabled object is set to TRUE
and var.time.valid is set to TRUE the generic LED
will be set to green. If cfg.dlna.dms.enabled is set to
FALSE the LED will be turned off.
If the objects are set to something else the led will be set to red.
Example using the RgbLed and RgbColorAlias tags
Here follows an example of a front panel configuration file showing
usage of the RgbLed and RgbColorAlias tags:
<?xml version="1.0"?>
<FrontPanelConfig version="2.1">
<RgbColorAlias paneltype="vip4302" name="red-low" color="#200000" />
<RgbColorAlias paneltype="vip4302" name="red-medium" color="#300000" />
<RgbColorAlias paneltype="vip4302" name="red-high" color="#FF0000" />
<RgbColorAlias paneltype="vip4302" name="green-low" color="#002000" />
<RgbColorAlias paneltype="vip4302" name="green-medium" color="#003000" />
<RgbColorAlias paneltype="vip4302" name="blue-low" color="#000020" />
<RgbColorAlias paneltype="vip4302" name="blue-medium" color="#000030" />
<RgbColorAlias paneltype="vip43XX" name="red-low" color="#120000" />
<RgbColorAlias paneltype="vip43XX" name="red-medium" color="#200000" />
<RgbColorAlias paneltype="vip43XX" name="red-high" color="#FF0000" />
<RgbColorAlias paneltype="vip43XX" name="green-low" color="#001200" />
<RgbColorAlias paneltype="vip43XX" name="green-medium" color="#002000" />
<RgbColorAlias paneltype="vip43XX" name="blue-low" color="#000012" />
<RgbColorAlias paneltype="vip43XX" name="blue-medium" color="#000020" />
<Panel type="vip43??">
<Expression value="#PowerProfile,#WiFiState">
<Result value="active,connected">
<RgbLed id="1" color1="blue-low" color2="blue-medium"
transitiontime="1000" holdtime="2000" />
</Result>
<Result value="active,connecting">
<RgbLed id="1" color1="#000000" color2="blue-medium"
transitiontime="400" holdtime="0" />
</Result>
<Result value="active,*">
<RgbLed id="1" color1="green-low" color2="green-medium"
transitiontime="1000" holdtime="2000" />
</Result>
<Result value="active_standby,*">
<RgbLed id="1" color1="red-low" color2="red-medium"
transitiontime="1000" holdtime="2000" />
</Result>
<Result value="*">
<RgbLed id="1" color1="red-high" color2="red-high"
transitiontime="1000" holdtime="2000" />
</Result>
</Expression>
</Panel>
</FrontPanelConfig>
This configuration will cause the Front Panel Service to act as follows:
-
If the power profile is active and WiFi is connected,
RGB LED 1 will start transitioning between the two colors "blue-low"
and "blue-medium", where each color will be stable for 2000 ms before
transitioning over to the next color, with the transition taking 1000
ms.
-
If the power profile is active and WiFi is connecting (i.e., the
WiFi module is trying to establish or re-establish its connection), RGB
LED 1 will start transitioning between the two colors "#000000" (no
light) and "blue-medium", where each color will be stable for 0 ms
before transitioning over to the next color, with the transition taking
400 ms. This color transition should be quite noticeable for an end-user.
-
If the power profile is active and the WiFi is in any other state
(e.g. inactive), RGB LED 1 will start transitioning between the two
colors "green-low" and "green-medium", where each color will be stable for
2000 ms before transitioning over to the next color, with the transition
taking 1000 ms.
-
If the power profile switches to active_standby, RGB LED 1 will start
transitioning between the two colors "red-low" and "red-medium", where
each color will be stable for 2000 ms before transitioning over to the
next color, with the transition taking 1000 ms.
-
If the power profile switches to any other standby mode, RGB LED 1 will
be configured to emit the static color "red-high".